
4.3
Owner's of the ADC Clothes Dryer AD-310 gave it a score of 4.3 out of 5. Here's how the scores stacked up:


81
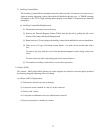
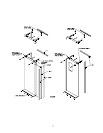
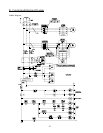
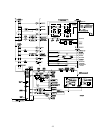
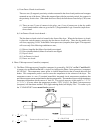
f. 4-Way Valve, and 3-Way Valve and Supply Air Disable Valve Replacement
1) Discontinue electrical service to the dryer.
2) Disconnect compressed air supply
from the dryer.
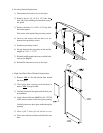
3) Remove the 1/4-20 self-tapping
screws securing the pneumatic panel
cover.
4) Remove the two (2) 1/4-20 screws
securing the junction box cover.
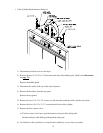
5) Loosen the cord grip cap that the valve
wire go through.
6) Loosen the appropriate wire on the
terminal strip.
Identify these wires and make note of
their placement.
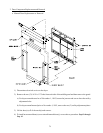
7) Loosen the bolts holding the assembly to the pneumatic panel.
(For 3-way valve/supply air disable valve replacement proceed to Step #13.)
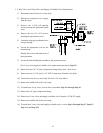
8) Remove the two (2) 1/4" poly compression fittings (door open - door close).
9) Remove the two (2) 1/4" poly x 1/8" M.P.T. connectors from the valve body.
10) Twist/remove the 4-way valve body off of the 1/8" street elbow.
11) Remove the muffler off of the valve body.
12) To install new 4-way valve, reverse above procedure (Step #11 through Step #1).
13) Remove the 1/4" poly compression fitting.
14) Remove the 3-way valve and supply air disable valve from the 1/8" M.P.T. nipple.
15) Remove the muffler off of the valve body.
16) To install new 3-way valve and supply air disable valve, reverse Step #1 through Step #7, Step #13,
Step #14, and Step #15.


Find Your Products By Category
Please Login
